Nowadays there are many options when it comes to deploying a React application to the cloud. In this blog article I will walk you through a step-by-step guide on how to deploy a React application to Microsoft Azure Cloud using Azure DevOps platform.
Prerequisites
First, you need to create two accounts:
- Microsoft Azure Account – for accessing Azure Portal and hosting your application. If you don’t have an account yet, you can create one for free using this link.
- Azure DevOps Account – for storing the source code and implementing build and release pipelines. Azure DevOps is free to use and if you don’t have an account yet, you can create one using this link.
Since we are going to deploy our React application to Azure, you also need to download and install NodeJS.
Creating Resource Group and App Service
Once you created an account for Microsoft Azure and signed in to the Azure Portal you should be able to see your dashboard like on the picture below. In the next steps we are going to create a resource group and an app service.

A Resource Group is a container that includes all resources which are related to the app we are building or it includes only those resources that we want to manage as a group. It is recommended to add resources that share the same lifecycle to the same resource group so they can be easily deployed, updated or deleted as a group.
An App Service is a fully managed service for building, deploying and scaling web applications. In this article I am using Azure Portal to create it, but the same can be achieved with Azure CLI or Azure PowerShell.
Steps to create a Resource Group
- Select Resource Groups from the dashboard and click on Create button.

- Create a resource group by selecting your Azure subscription, entering a new resource group name and selecting a region – Azure location where your resources are going to be stored.

- Click on Review + create button and once the validation has passed you can click on the Create button. It may take a few seconds to create a resource group.
- Click on Refresh from the top menu to refresh the resource group list and then select the newly created resource group to open it. Alternatively you can also click on a notification from the top menu and then click on the Go to resource group button to open the newly created resource group.
The next step is to create an App Service.
Steps to create an App Service
- Go back to your dashboard in Azure Portal, select App Services and click on Create button.

- Create a Web App by selecting your Azure subscription and previously created resource group. Give a unique name to your application. For Publish choose Code and select Node 12 LTS as Runtime stack and Windows or Linux as Operating System. Finally, select the Region where you want to store your resources (usually closest to your location). Leave App Service Plan as default.

- Click on Review + create button and once the review is completed you can click on the Create button. It may take some time to create a Web App.
- Once the Web App is created you can click on Go to resource button. You should see the following information in your dashboard.

- You can visit the URL in the right top corner https://<your app service name>.azurewebsites.net to see it in action. Right now you will only see a default page from Microsoft, but our React application will be deployed on this same URL.
The next step is to create our React application.
Creating a React Application
We are going to use a simple React application created using create-react-app. Navigate to a directory of your choice in a terminal and run the following command:
npx create-react-app react-azure-demo
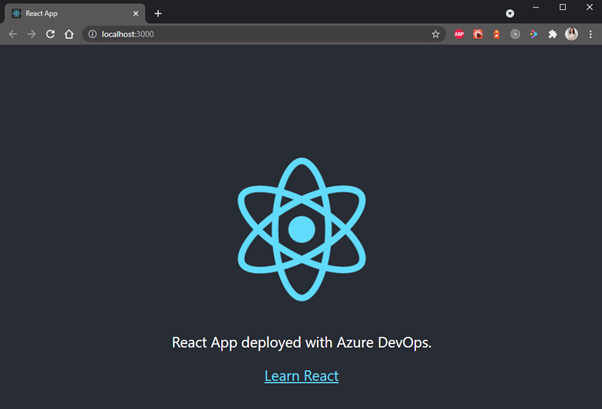
Now, let’s open App.js file, change the text inside <p> tag to “React App deployed with Azure DevOps” and save it.
From the command line run the following command:
npm run start
This should start your React application locally and you should see something like this:
Deploying React Application with Azure DevOps
Azure DevOps is a software as a service (SaaS) platform from Microsoft that provides an end-to-end DevOps toolchain for developing and deploying software.
Microsoft Azure Documentation
Once you sign up for Azure DevOps you can create a project to put all your repositories and pipelines.
Steps to configure Azure DevOps
- Create a new organization or use an existing one if you have one.

- Create a new project within your organization. Enter a unique project name, select preferred visibility of your project and click on Create project button.

- Commit your changes. Navigate to your project in the command line and run the following commands:
git init
git add .
git commit -m "initial commit"
- Push the React application from your local machine to Azure DevOps project. Go to Repos in your project in Azure DevOps and copy and execute the following commands in your command line:

You may be requested to log in into your Azure account to proceed further. After running these commands, you can see your React project under Repos -> Files.

The next step is to create build and release pipelines to deploy the React application with Azure DevOps.
Steps to create a Build Pipeline
- Select Pipelines in the left menu and click on Create Pipeline button.
- Choose Use the classic editor to create a pipeline without YAML option.

- Select Azure Repos Git as the source and leave everything else as default. Click on Continue button.
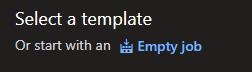
- Choose Empty job instead of selecting a template.
- Click on + sign to add tasks to Agent job 1.

- Search for npm and add 2 npm tasks – one is for installing the dependencies of the React application and the other one is for building the project.
- Select the second npm task and configure it as follows:

- Search for Publish build artifacts task and add it to Agent job 1. Change Path to publish to build, so that the release pipeline has access to the generated build.

- Go to the Triggers tab and select Enable continuous integration.

- Click on Save & queue dropdown in the top menu and then click on Save & queue option. Run pipeline modal will open. Leave everything as default and click on Save and run button.

Your job might fail with the following error:

To fix that you will need to request a free parallelism grant by filling out the form linked in the error message. It usually takes up to 2 days for Microsoft to approve the request.
- The pipeline will finish running after a few minutes. You can check it under Pipelines menu item.
Steps to create a Release Pipeline
A release pipeline stores the data for deployments in Azure Pipelines. It will deploy the artifacts that were built in the previous step.
- Create a new pipeline by selecting Pipelines -> Releases and clicking on New pipeline button.
- Select template Azure App Service deployment and click on Apply button.

- Give your stage a name (i.e. Test) and close it.
- Click on Add an artifact and select the build pipeline that you created previously as Source. Click on Add button.

Steps to configure Continuous Deployment
- Click on the lightning icon in Artifacts and enable Continuous deployment trigger. This will create a new release every time a new build is available. Also add main branch as build branch filter and close the dialog.

- Click on 1 job, 1 task link in Stages block to finish configuration of the Azure App Service deployment. Select your Azure subscription. You may be asked to authorize it by clicking on Authorize button. Also select App service name which you created previously.

- Click on Deploy Azure App Service and select drop folder as folder which contains app service contents generated in build process.

- Click on Save in the top right corner and then click on OK without changing anything in the modal dialog which will appear.
- Now click on Create release (next to the Save button) which will become enabled. Another modal dialog will appear, but you can leave everything as it is and click on Create button.
- Under Pipelines -> Releases you can see the newly created release pipeline running. It may take a few minutes until it succeeds.

Once release pipeline is successfully completed, you should be able to see your deployed application on https://<your app service name>.azurewebsites.net.
Since we configured continuous deployment, every time there is a new change pushed to the main branch, a new build and release will be triggered automatically.
In case you are using client-side routing in your React application like react-router library, you will need to add the following web.config file to your root folder.
<?xml version="1.0"?>
<configuration>
   <system.webServer>
      <rewrite>
         <rules>
            <rule name="React Routes" stopProcessing="true">
              <match url=".*" />
              <conditions logicalGrouping="MatchAll">
                <add input="{REQUEST_FILENAME}" matchType="IsFile" negate="true" />
                <add input="{REQUEST_FILENAME}" matchType="IsDirectory" negate="true" />
                <add input="{REQUEST_URI}" pattern="^/(api)" negate="true" />
              </conditions>
              <action type="Rewrite" url="/" />
            </rule>
         </rules>
      </rewrite>
   </system.webServer>
</configuration>
This file has a URL rewrite configuration that takes any route and points it to the root of the application.
Summary
In this blog article, I showed you how to use Azure DevOps to set up a build and release pipeline to deploy a React application to Microsoft Azure cloud. First we created a resource group and an app service in Azure Portal and then we configured build and release pipelines in Azure DevOps to be able to deploy our React application.
Azure DevOps is a Software as a Service (SaaS) platform from Microsoft which provides tools that cover all areas of software development life-cycle.
This is only one of many ways to deploy React application to Azure. In my next article I will show you how to deploy the same application using Azure App Service extension for Visual Studio Code.